How to Size an LED Tree Ring Light: Trunk Diameter, Growth Gap and Mounting
Short answer: calculate the ring’s inner diameter as Dr = Dt + 2C, using the trunk diameter at the height where the ring will sit and a clearance chosen for the species and mounting method. Then check the outer diameter against the site, plan drainage and cable access, and test a sample at night before ordering.
Most sizing mistakes with tree ring lights are made with a tape measure, not with a catalog. The trunk is measured at chest height when the ring will sit at ground level, the root flare is forgotten, or the nearest standard ring is ordered without checking how much gap it leaves. The result is either a ring that will press on the bark within a few seasons, or one so loose that the trunk looks dim and the LEDs glare at people walking past.
This article gives a simple formula for the inner diameter, then covers the site details that decide whether that number works in practice: clearance for growth, how far the LEDs sit from the trunk, mounting method, drainage and cabling. For an overview of ring light types and applications, see our complete guide to LED circular tree lights.
1. How to Calculate the Required Inner Diameter
The inner diameter of the ring is the trunk diameter plus a clearance on each side:
Dr = Dt + 2C
- Dr = required inner diameter of the ring
- Dt = trunk diameter at the height where the ring will sit
- C = clearance left on one side between the trunk and the ring
If you measured the circumference rather than the diameter, convert it first:
Dt = circumference ÷ 3.14
Worked example (metric). Trunk circumference at ring height: 94 cm, so Dt ≈ 30 cm. With an assumed clearance of 5 cm per side: Dr = 30 + 2 × 5 = 40 cm.
Worked example (imperial). Trunk circumference: 47 in, so Dt ≈ 15 in. With an assumed clearance of 2 in per side: Dr = 15 + 2 × 2 = 19 in.
The clearance values in these examples are only there to show the calculation. They are not a standard for every tree. Section 3 explains how to choose C for your own project.
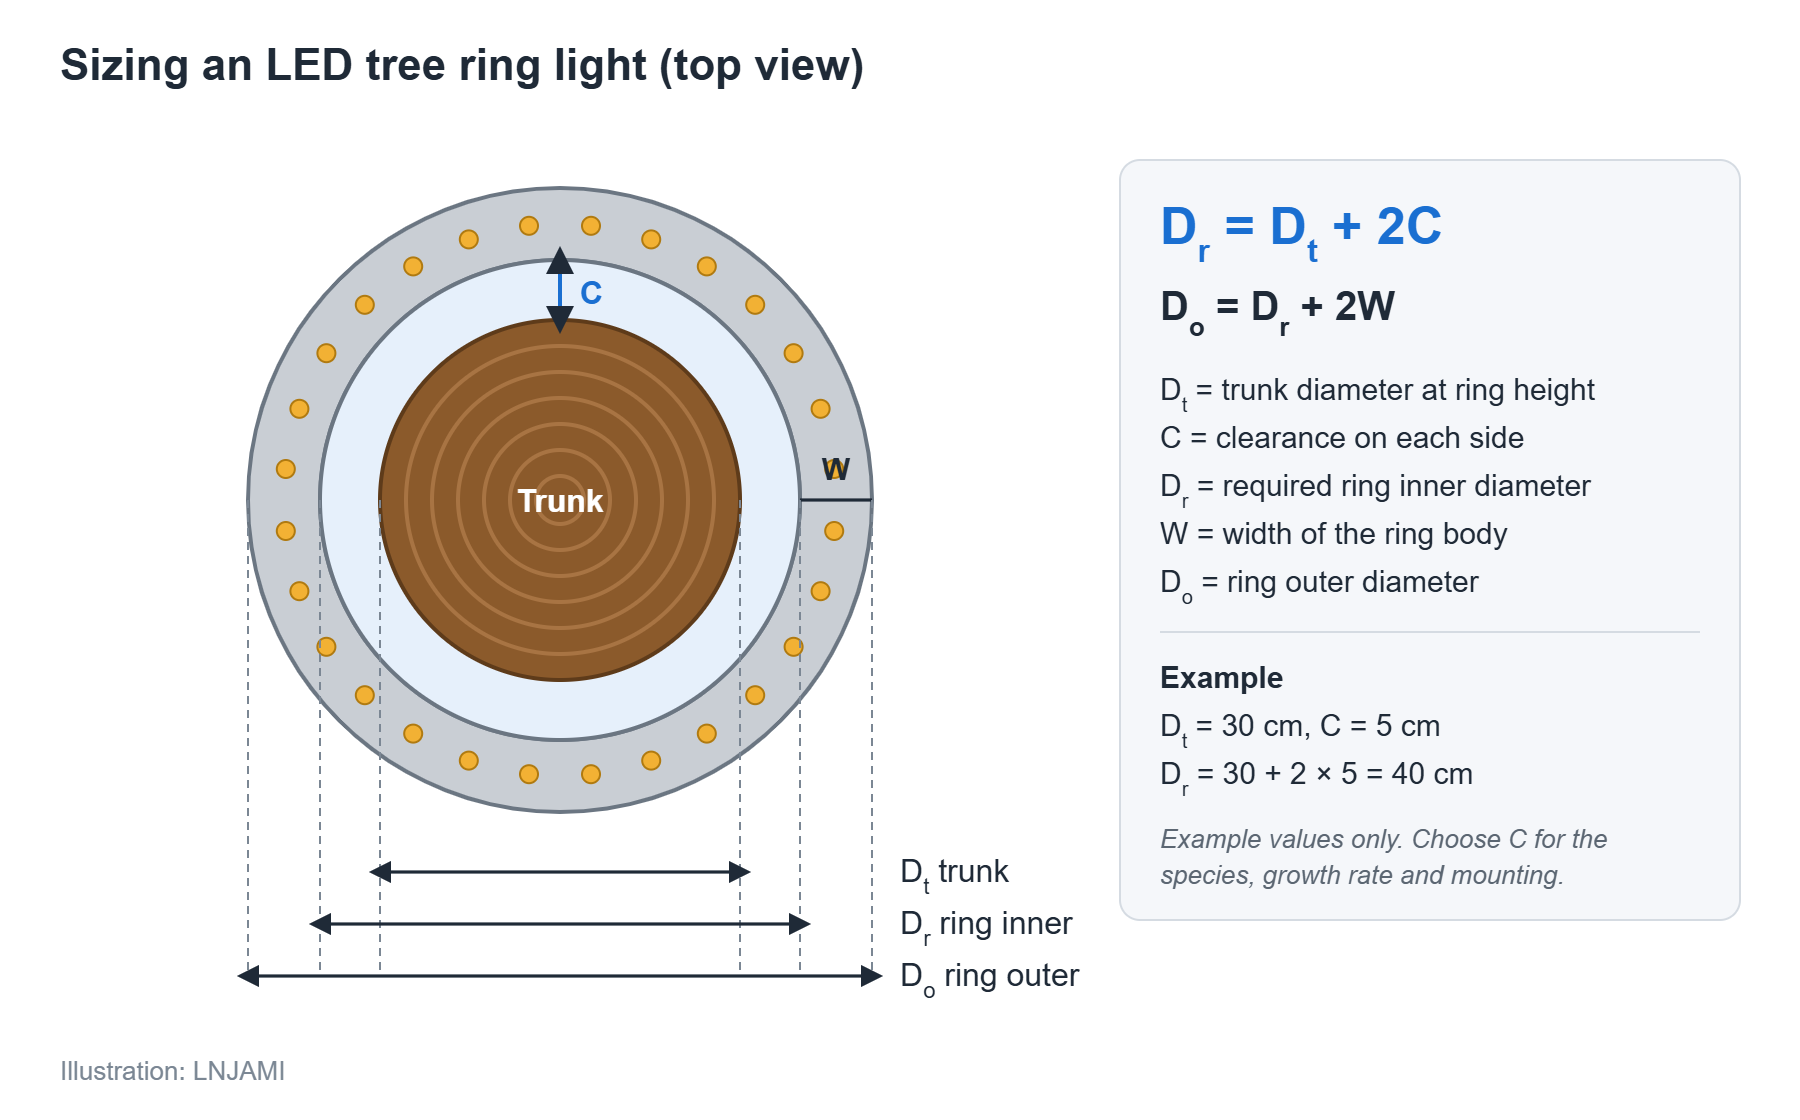
When the standard size does not match. Rings are often made in fixed sizes. Choose the nearest size that is equal to or larger than Dr, then check the real gap it leaves: (ring inner diameter − Dt) ÷ 2. If the next standard size up leaves a gap far larger than you planned, the LEDs end up well away from the trunk and the effect changes (see section 5). In that case a segmented or custom ring is usually the better answer.
2. Getting the Trunk Diameter Right on Site
The formula is only as good as Dt. A few habits avoid most errors:
- Measure at ring height. Chest-height measurements, which arborists often record, can be much smaller than the trunk at the base.
- Ground rings: measure around the root flare. Many trees widen sharply where they meet the soil, and large surface roots may run outwards. A ring at ground level has to clear the flare and should not sit on roots.
- Oval trunks: use the longest width. Measure the longest and shortest widths across the trunk. Size the ring on the longest width, and note both values for the supplier.
- Multi-stem trees: measure around the whole group of stems at ring height.
- Photograph the trunk from the side and from above with the tape visible. It answers many questions before they are asked.
|
Circumference |
Trunk diameter Dt (approx.) |
|---|---|
|
31 cm (12 in) |
10 cm (4 in) |
|
63 cm (25 in) |
20 cm (8 in) |
|
94 cm (37 in) |
30 cm (12 in) |
|
157 cm (62 in) |
50 cm (20 in) |
|
251 cm (99 in) |
80 cm (31 in) |
3. Choosing the Clearance C
C is an initial installation clearance, not a guarantee that the ring will never need attention. How quickly a trunk thickens depends on species, age, climate, soil and irrigation, so no single value suits every tree. In practice:
- Mature, slow-growing trees can take a smaller clearance, as long as the ring never touches the bark.
- Young or fast-growing trees need more room, or better, an adjustable or segmented ring that can be enlarged instead of replaced.
- Palms usually have straight trunks that change diameter slowly once established, which makes them easier to fit.
- Where a local arborist is involved, ask for the expected growth of that species over the life of the lighting system and size C from that.
Two rules apply to every tree. The ring must not press on the bark at any point, and the fixing method must not damage the tree: no screws or nails into the trunk, and no straps tightened around it. Plan an inspection at least once a year to check the gap, and enlarge or reposition the ring before it makes contact.
4. Check the Outer Diameter Too
The inner diameter decides whether the ring fits the tree. The outer diameter decides whether it fits the site. If the ring body is W wide, the outer diameter is roughly:
Do = Dr + 2W
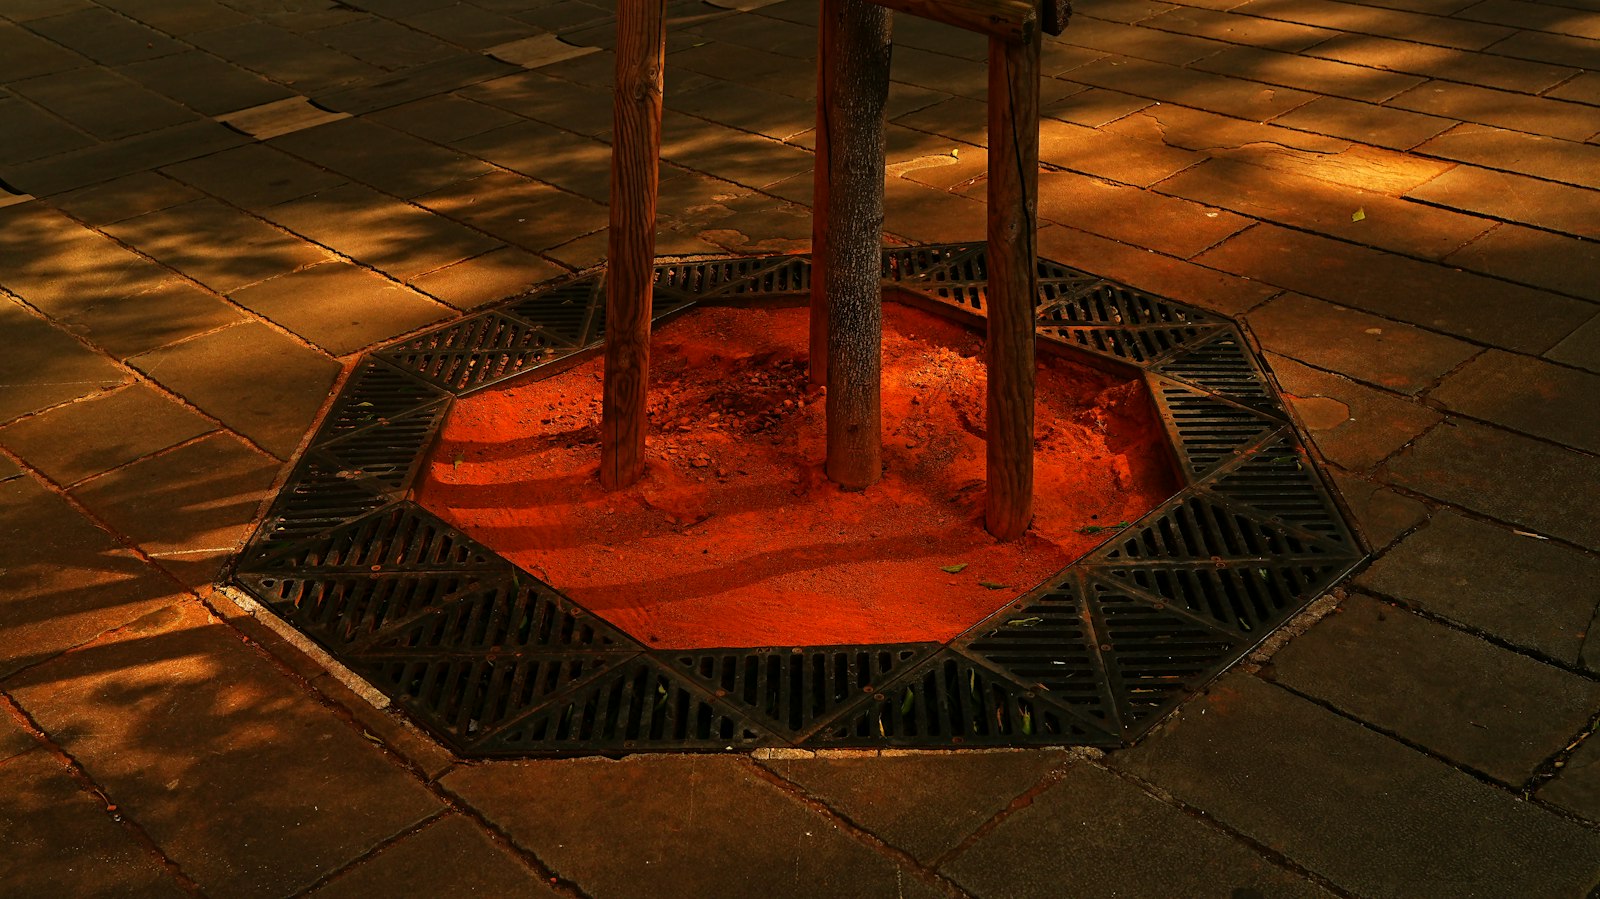
This matters when the tree stands in a tree grate, a raised planter or a paved surround. The opening must take the full outer diameter plus room for installation and drainage around it. It is a common reason for a correctly sized ring failing to fit on site.
5. Distance From the Trunk Changes the Look
The clearance C does more than protect the tree. It sets how far the LEDs are from the bark, and that changes the lighting effect even when power and beam angle stay the same.
Take a landscape tree around 5 m tall and compare two installations with the same fixture:
- Ring close to the trunk. Light runs almost parallel to the bark. The lower trunk shows strong texture, but much of the light travels straight up past the trunk, and the lower part can look much brighter than the canopy. Smooth, light-colored bark can show a hot spot at the base.
- Ring about 30 cm away from the trunk. Light meets the trunk at a wider angle and lands higher up, so the trunk looks more even and more light reaches the lower canopy. Texture is softer, and more of the ring and its light are visible to passers-by.
Which result is better depends on the tree and the design intent, and the difference is hard to predict by eye. Height, canopy density, bark color, beam angle, luminous flux and the tilt of the LEDs all interact. For important projects, ask the supplier for IES photometric files and run a quick simulation of the actual tree position before fixing C and the ring size. LNJAMI can provide IES files for the fixtures used in your project.
Bark also matters. Light, smooth bark such as plane or birch reflects a lot of light, so a lower output may be enough. Dark, rough bark absorbs more light and shows texture well, but usually needs more output to look equally bright.
6. Surface-Mounted, Recessed or on the Trunk?
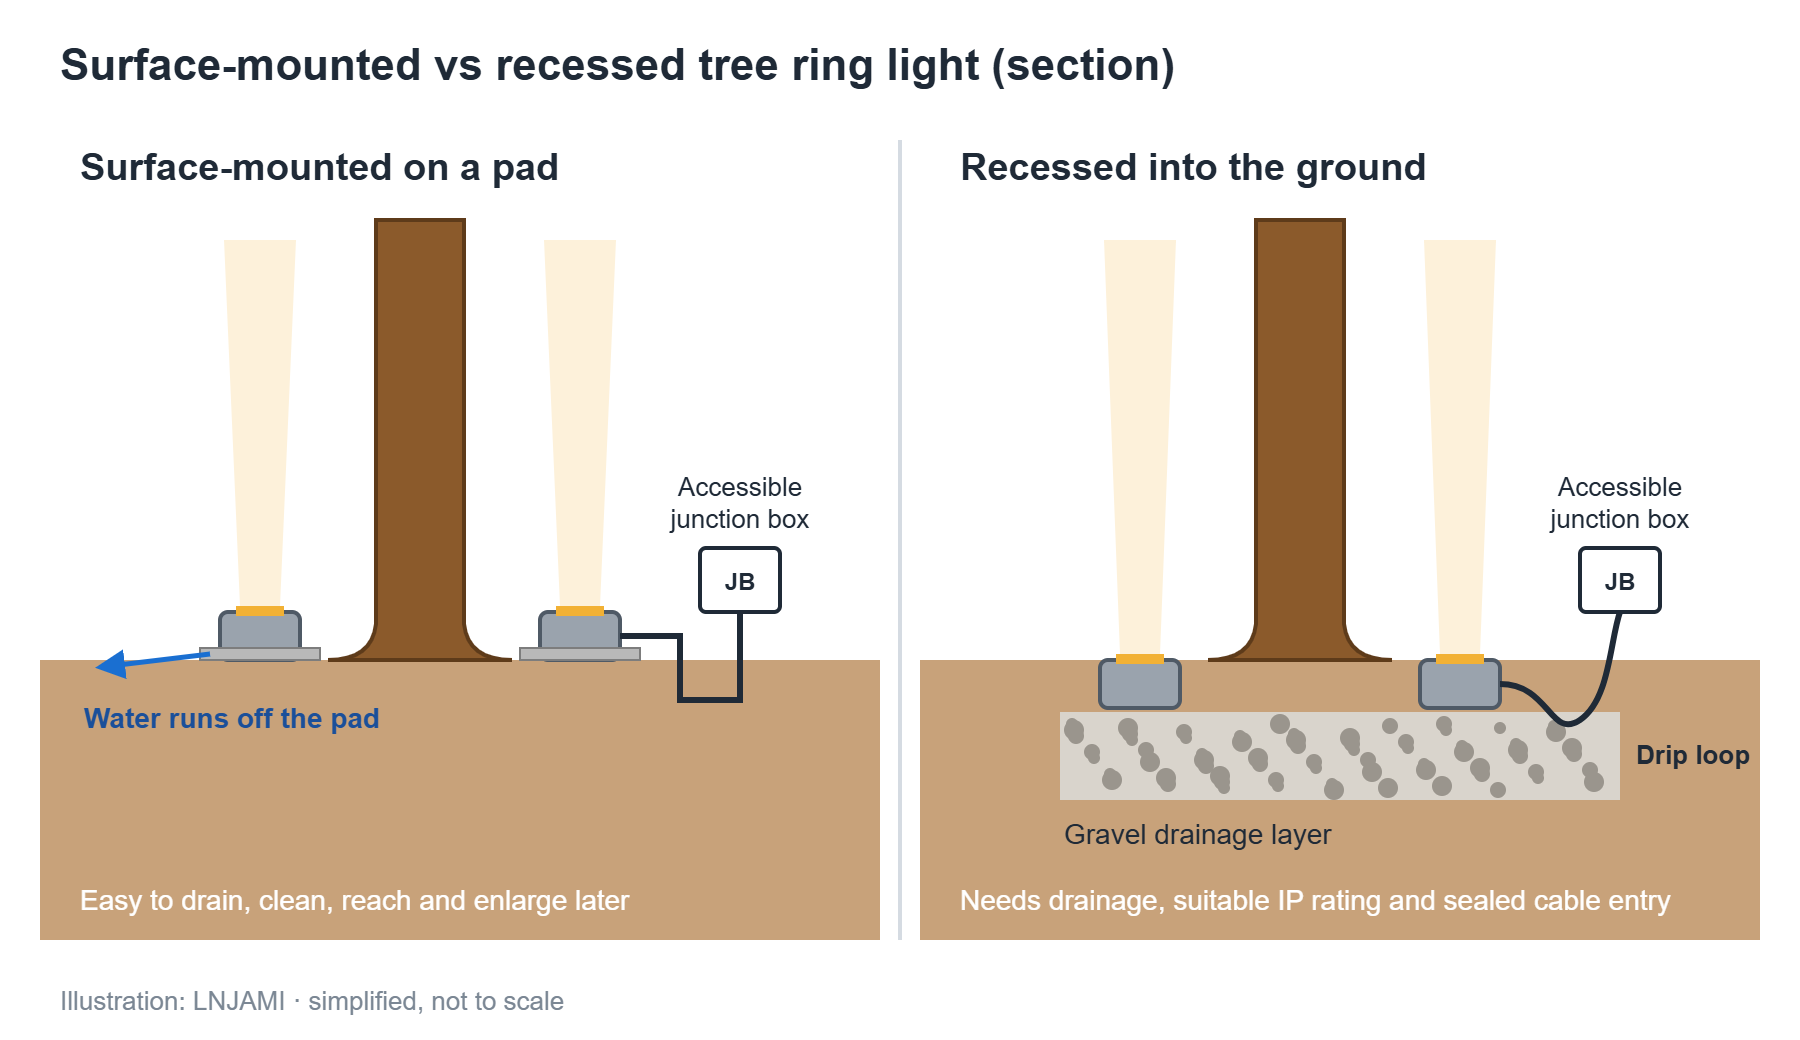
Surface-mounted on the ground
The ring sits on a small base or pad around the tree. It is easy to install, easy to reach for cleaning and simple to enlarge or move later. Water drains away naturally. The ring is visible during the day and, in lawns, needs protection from mowers and trimmers.
Recessed into the ground
A recessed ring sits flush with the surface, which looks clean and keeps it out of the way of mowers and foot traffic. The trade-off is water: a recessed fixture sits in the lowest place around it. It needs a proper drainage bed, a higher ingress protection rating and careful cable sealing (see section 7). It is also harder to enlarge as the tree grows, so leave more clearance.
Mounted on the trunk
Some projects lift the ring above ground level using adjustable brackets around the trunk. This avoids ground water and root flare, but the fixing must be non-damaging and adjustable, and needs regular checks as the trunk grows.
7. Water, Drainage and Cable Entry
Most failures of outdoor ring lights start with water, not with the LEDs. Before installation, look at the ground around each tree:
- Does water collect around the trunk after rain or irrigation? Tree pits and planters are often low points. Recessed rings in these places need a gravel drainage layer underneath and a path for water to leave.
- Is the surface sloped away from the fixture? Soil, mulch and paving should not direct water onto the ring. Keep mulch from covering the lens.
- Where does the cable enter? Cable entries should be sealed with suitably rated glands, and should not sit at the lowest point of the fixture. A drip loop before the entry stops water running along the cable.
- Where are the connections? Make joints in a sealed, accessible junction box, not buried loose in the soil, so they can be checked and repaired without digging up the fixture.
- Is there spare cable? Leave enough slack to enlarge or reposition the ring as the tree grows, and run cables in conduit so they can be replaced later.
- Is the power supply protected? Use GFCI/RCD protection on outdoor circuits and have mains wiring done by a licensed electrician. In public areas, low-voltage systems are often preferred near pedestrians.
- Is the fixture protected mechanically? In parks and streets, rings can be stepped on, kicked or hit by maintenance equipment, so housing strength matters as much as the IP rating.
8. What to Check During a Sample Test
Testing one ring on a real tree before ordering a full batch is worth the extra step, because many sizing and optical problems only show up at night on site. When you test, look for:
- How high the light reaches on the trunk and how much enters the canopy
- Whether there is a bright hot spot at the base
- How the bark color looks under the chosen color temperature
- Whether the LEDs are visible from normal eye height on nearby paths, seats and windows
- How much light spills onto the ground, paving or nearby walls
- How the ring sits on uneven ground, roots or paving, and whether water could collect around it
- Whether cable routes and junction boxes are practical to reach for maintenance
9. Before You Ask for a Quote
For each tree, or each group of similar trees, have the following ready:
- Species and approximate age
- Dt at ring height (or the circumference), plus root flare width for ground rings
- Trunk shape: round, oval, leaning or multi-stem
- Tree height and canopy spread
- Mounting: surface, recessed or on the trunk, and any grate or planter opening size
- Ground conditions: soil, lawn, paving, and whether water collects
- Available power and preferred control (switch, timer, DALI or DMX512)
- Preferred color temperature, or whether color-changing is needed
- Photos from the side and from above with a tape measure in view
With these details, a supplier can check the formula against real fixture dimensions, suggest a clearance that suits the species and site, and point out drainage or cabling issues before anything is ordered.
FAQ
What inner diameter should a tree ring light have for a 30 cm (12 in) trunk?
Start from Dr = Dt + 2C. With a 30 cm trunk and, for example, 5 cm of clearance on each side, the inner diameter is 40 cm. The right clearance depends on the species, its growth rate and how the ring is mounted, so treat this as a calculation example rather than a fixed size, and check the real gap left by the nearest available ring size.
How often should a tree ring light be checked or resized as the tree grows?
Inspect the fit at least once a year, and more often on young, fast-growing trees. Enlarge or reposition the ring before it touches the bark. Segmented or adjustable rings turn this into a simple adjustment instead of a replacement.
Can a tree ring light be installed around a tree in a tree grate?
Yes, if the grate opening takes the ring’s outer diameter (Do = Dr + 2W) with room left for installation and drainage. Measure the opening as well as the trunk. Grates and tree pits are often low points, so check where water goes before choosing a recessed fixture.
Is it better to recess a tree ring light or mount it on the surface?
Surface mounting is easier to install, drain, clean and enlarge later. Recessed rings look cleaner and stay out of the way of mowers and foot traffic, but they need a drainage bed, suitable ingress protection and careful cable sealing, and are harder to resize. Where water collects around the trunk, surface mounting is usually the safer choice.
For the bigger picture, see our complete guide to LED circular tree lights and our comparison of tree ring lights vs. spotlights.
Planning a tree ring lighting project? Send us your tree measurements and site photos for a free project consultation →