What to Do When Your Outdoor Wall Washer Bracket Is Too Low
In outdoor architectural lighting projects, even a slight deviation in the mounting bracket height—sometimes just a few centimeters—can completely ruin a carefully designed lighting effect. The result is often a jarring visual imbalance: bright glare at the base of the wall while the upper facade fades into darkness. This issue, often caused by incorrect LED wall washer installation, not only compromises the visual harmony of the building but can also lead to costly rework.
This article provides a comprehensive action framework, guiding you from on-site diagnosis to structural correction. We will explore how to accurately restore the intended facade lighting performance through engineering analysis (including arm extension and stiffness verification), optical adjustment, and customized bracket solutions—all while preserving the wall’s structural integrity and waterproofing.
Understanding the Role of Bracket Height
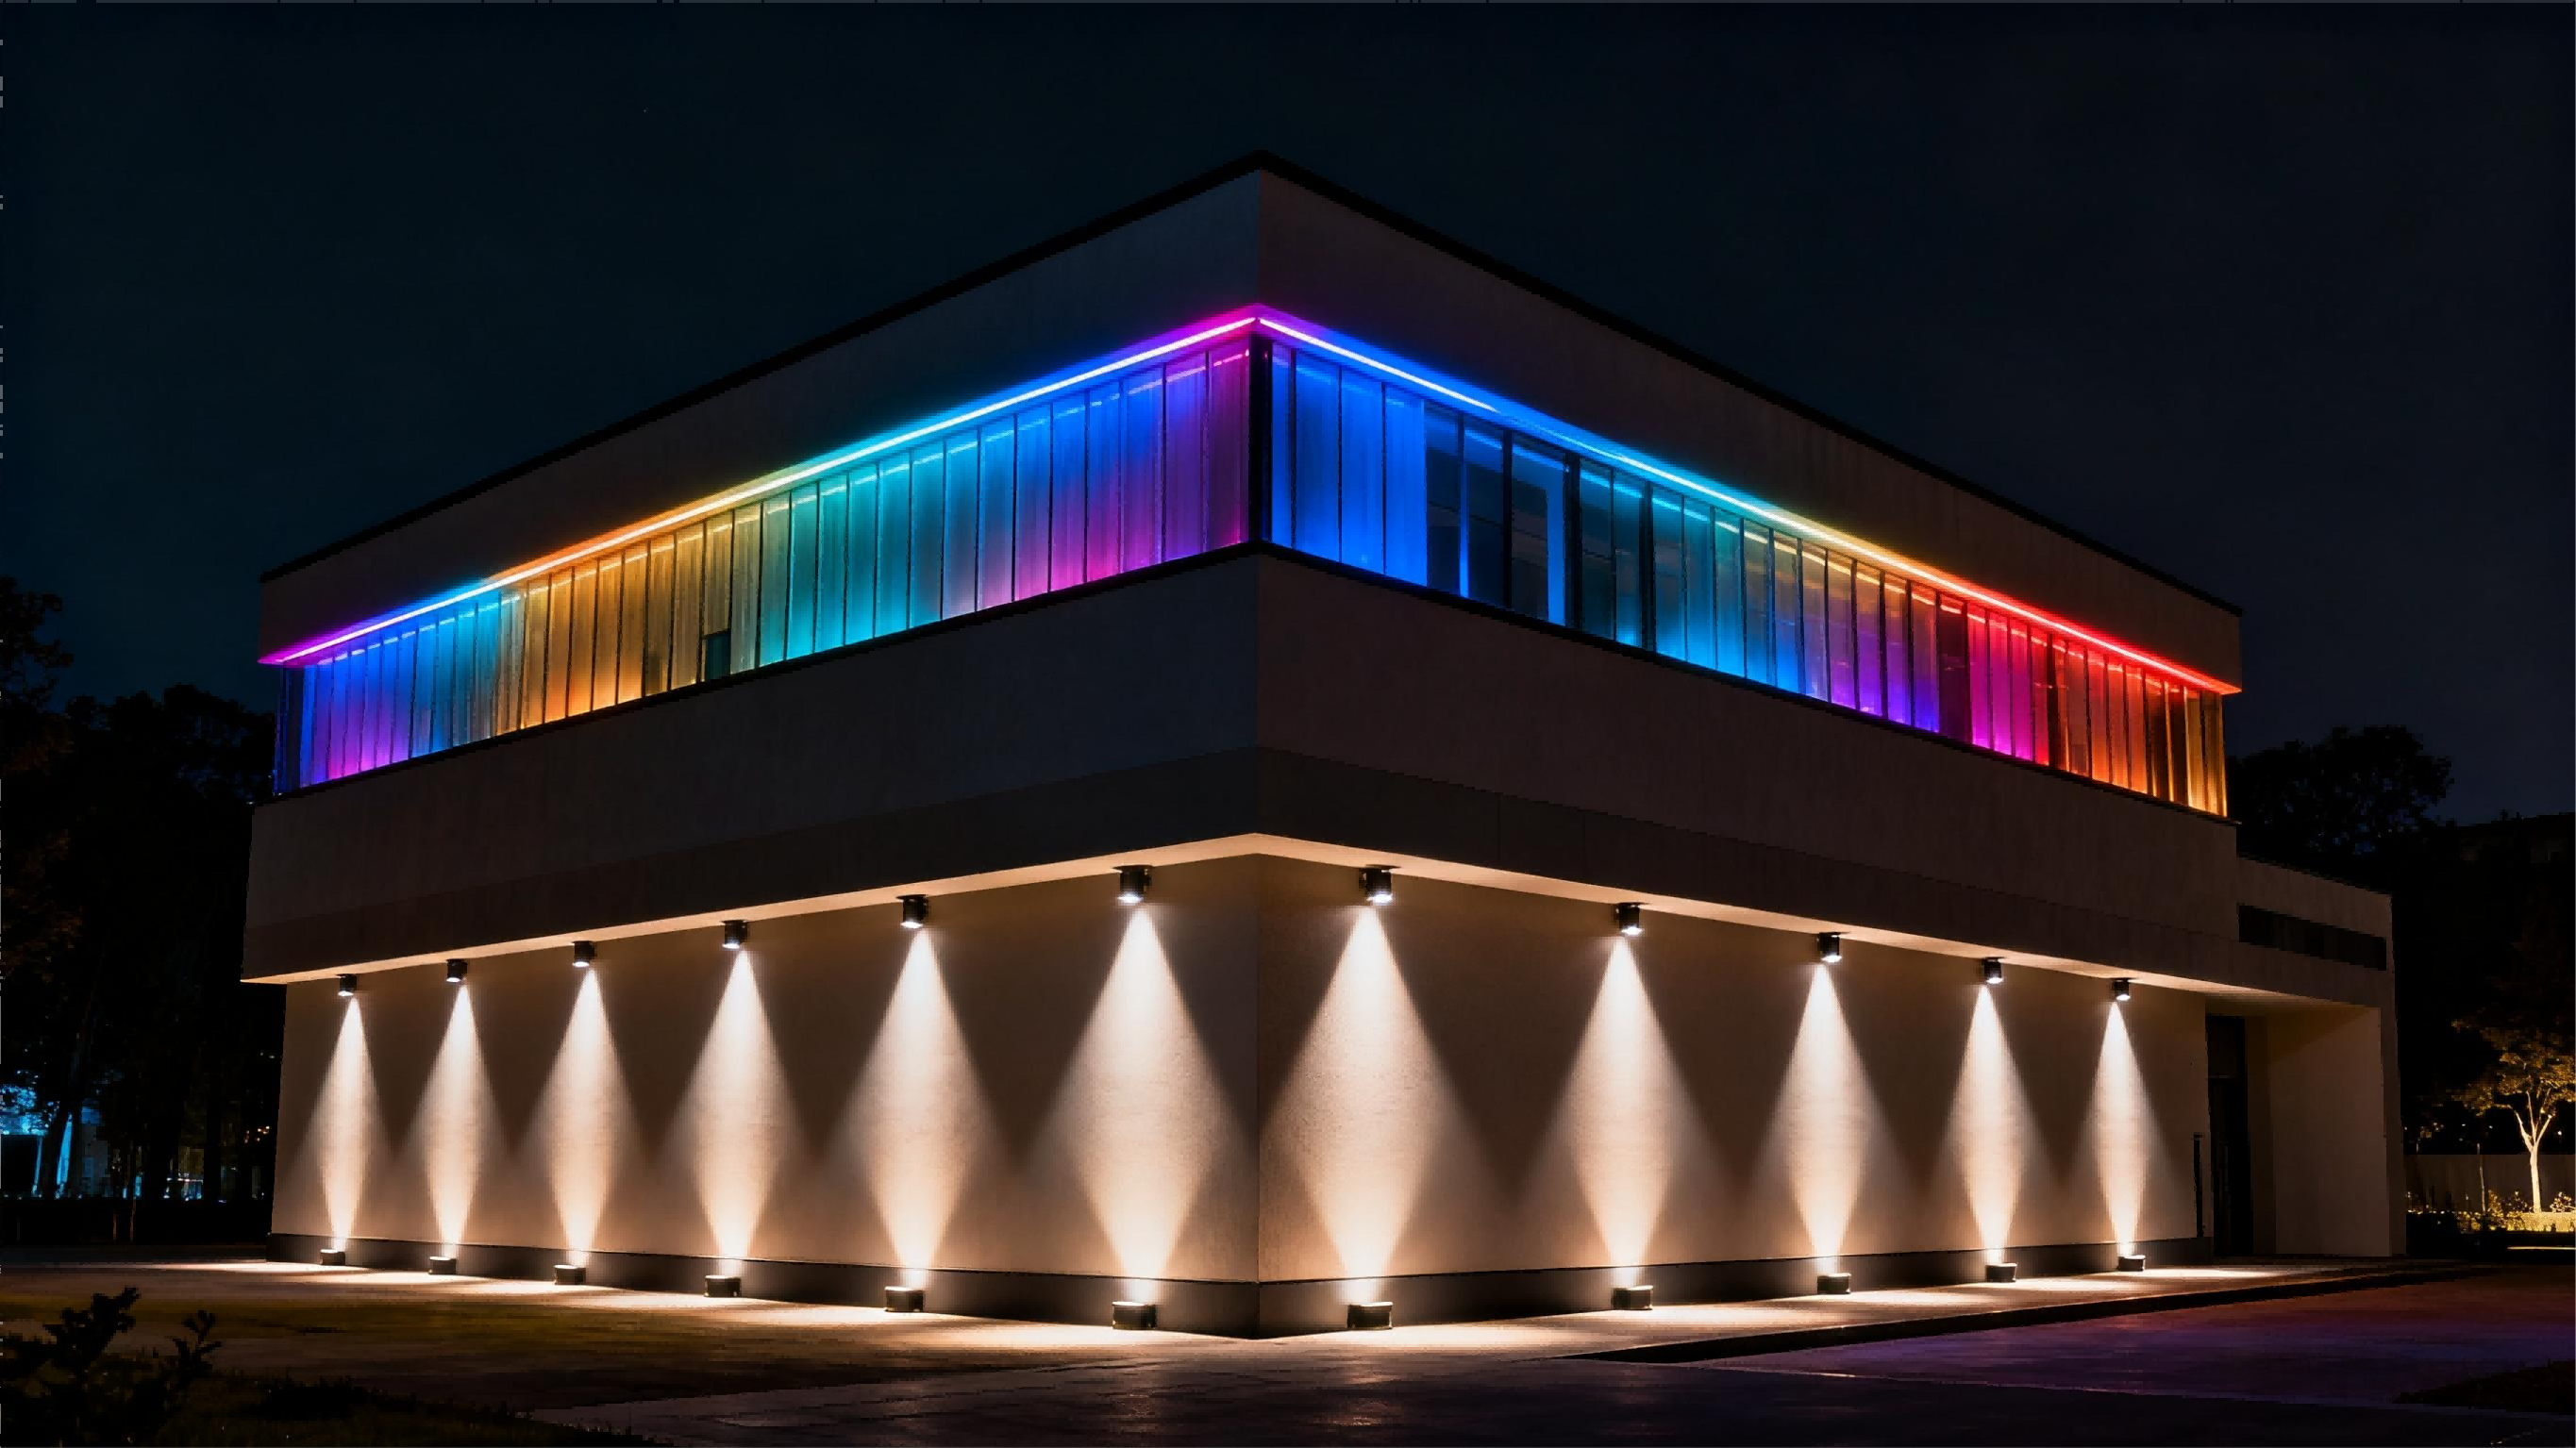
Bracket height directly controls where an outdoor wall washer’s light strikes the façade, so it strongly affects vertical uniformity, contrast and perceived texture. A bracket that's too low often produces bright lower sections and a dark upper wall or visible hot-spots; conversely, an excessively high or poorly aimed mount can create glare, unwanted spill and loss of surface detail.
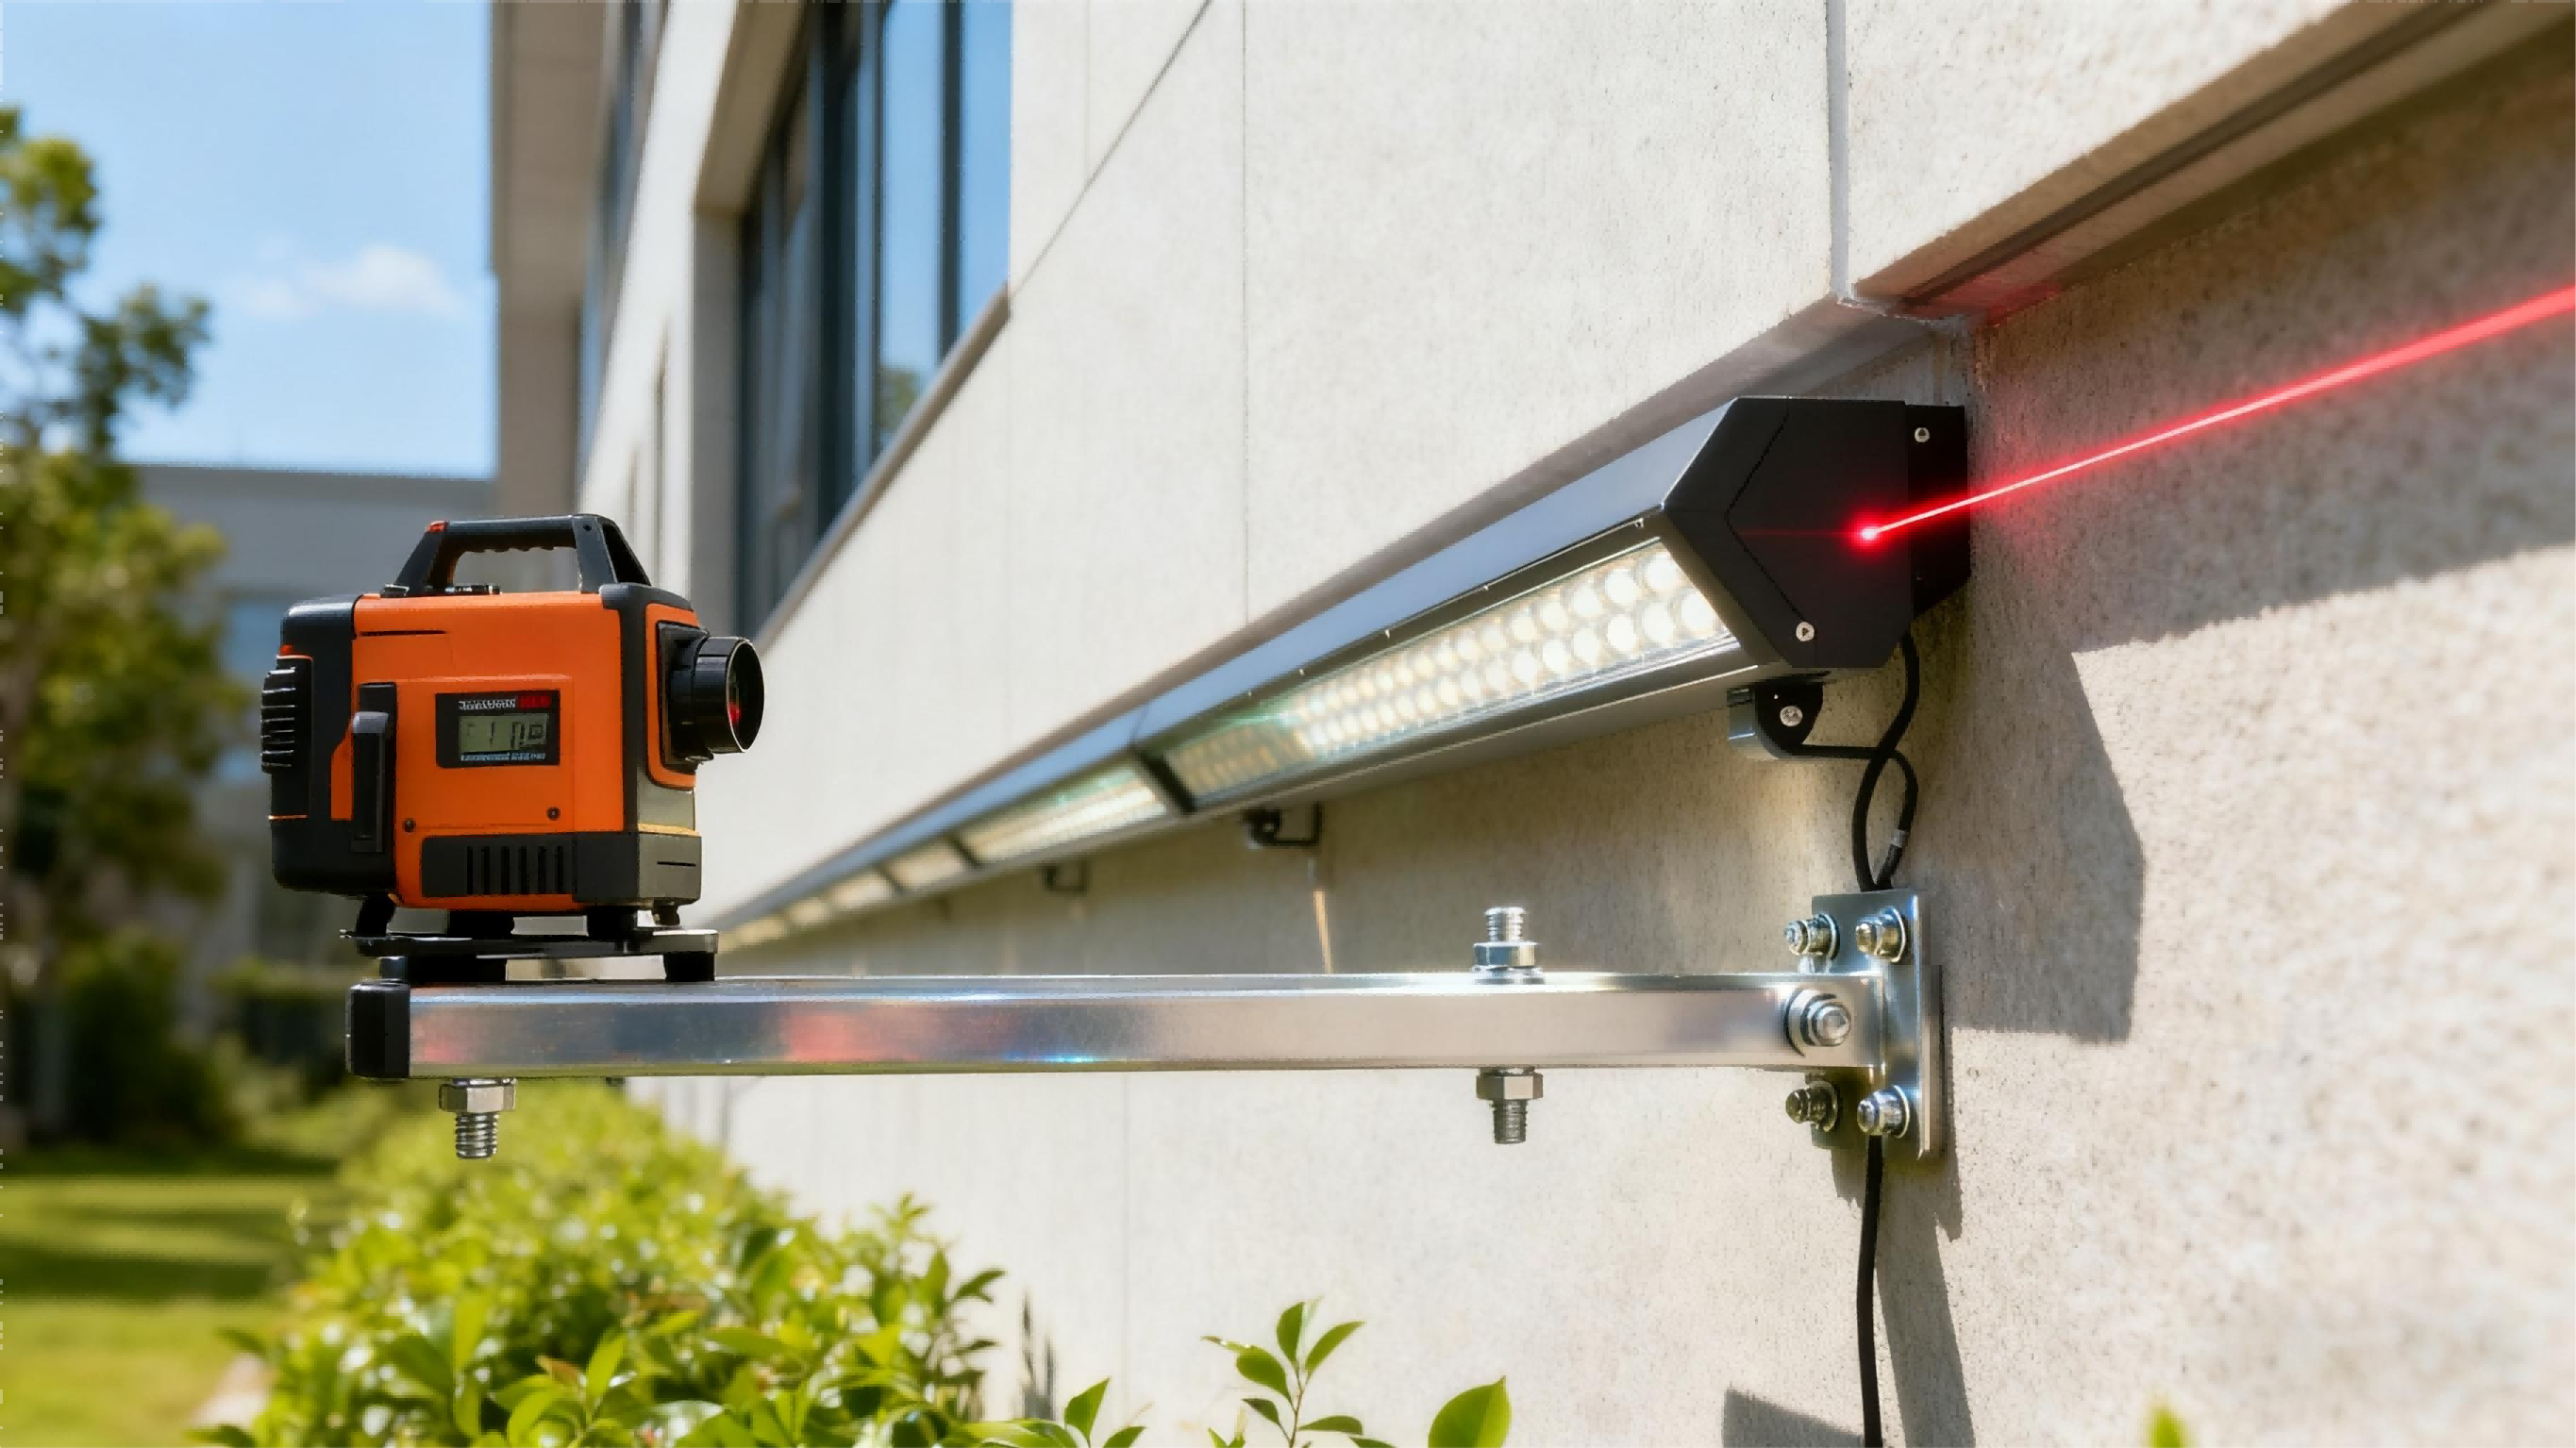
Bracket height must be considered together with the fixture’s beam distribution and throw distance (use the manufacturer’s IES photometric data when planning), because the same luminaire behaves very differently when moved a few centimetres. Always confirm calculations with a quick night-time mock-up from normal viewing positions and fine-tune bracket angle or height before finalizing the installation.
Common Causes of Low Bracket Problems
Low-bracket problems usually come from installation and coordination oversights, not design failure:
1. Poor coordination: brackets are sometimes placed after cladding or landscaping, leaving no suitable mounting height.
2. Site constraints: uneven ground, parapets, or restricted drilling areas can limit placement.
3. Generic hardware: off-the-shelf brackets often lack the elevation or tilt needed for proper wall washing.
4. Budget compromises: reusing old mounts or skipping custom supports can lead to misalignment and uneven illumination.
Dynamic loads overlooked: wind, vibration or maintenance activity can cause loosening if mounts were underspecified.
When you see uneven washing on site, first record: mounting height, fixture type + beam angle, and distance to wall. That trio tells you whether a mechanical adjustment, optical change, or both are required.
Practical Solutions for Low Bracket Installation
Below are five solutions ordered from least invasive to most structural. For two of them (spacers/extension arms and extension arm stiffness), I add concrete calculation steps and example numbers you can use on site.
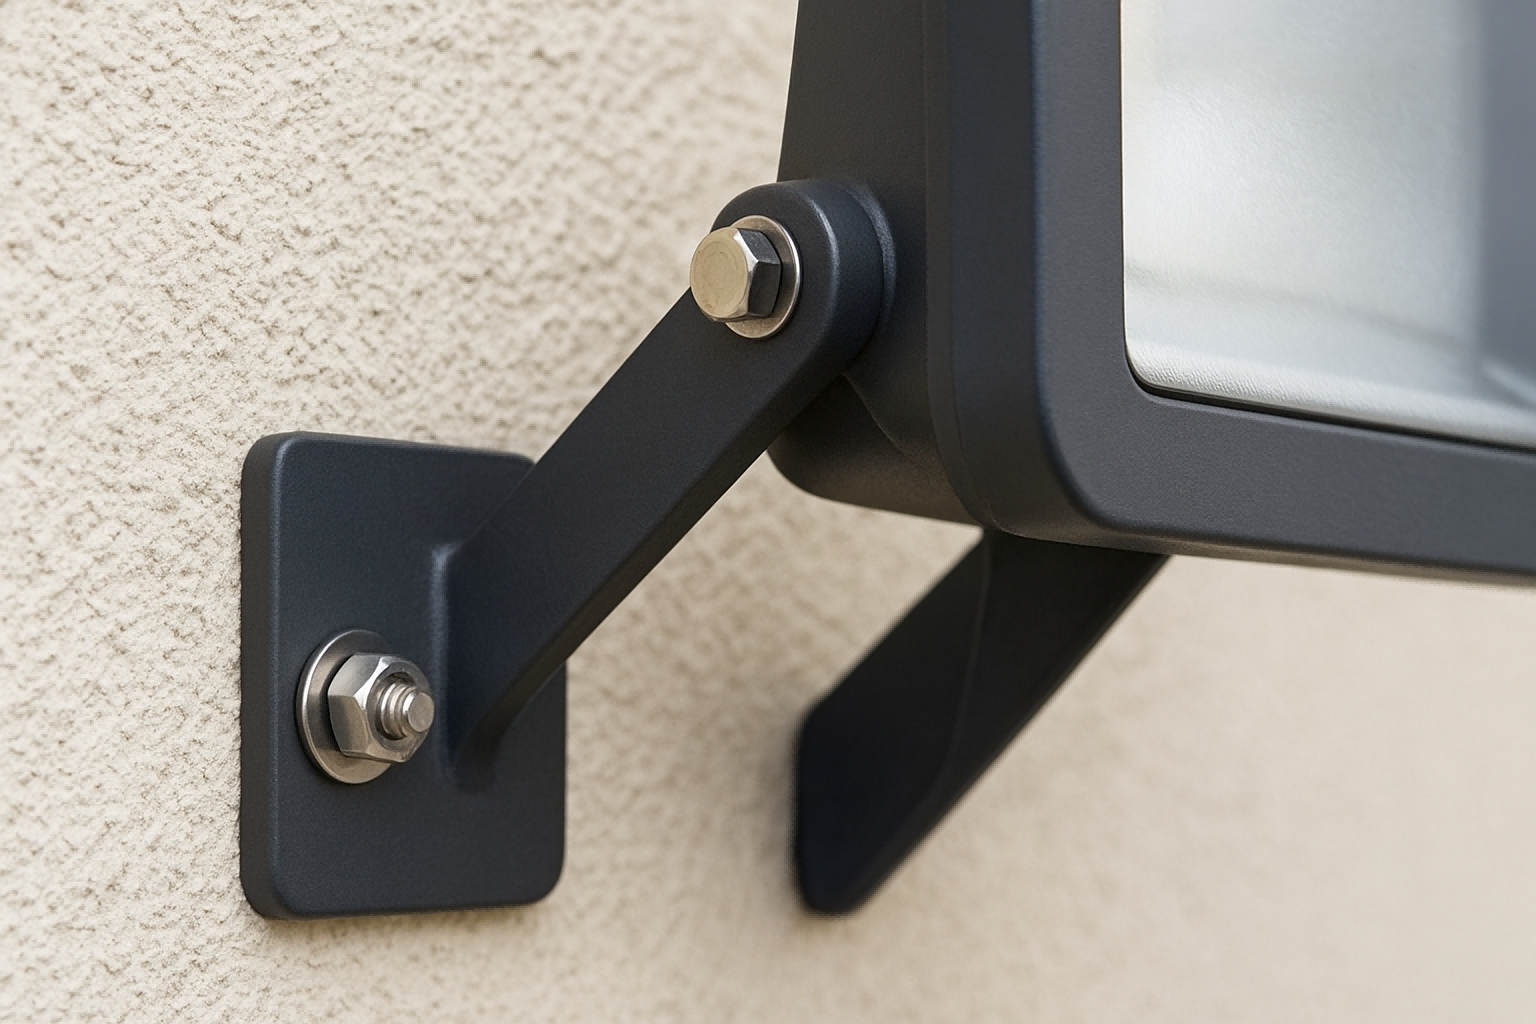
1) Use multi-angle adjustable mounting brackets
What to do: Replace fixed mounts with multi-axis brackets (vertical tilt ± range, horizontal yaw). Choose brackets with a positive locking mechanism (locking screws with scale) to prevent creep.
Why it works: Allows beam direction correction without new holes. Use during night commissioning to quickly bring overlap into tolerance.
Tools: Allen keys, torque wrench for locking screws, small spirit level or laser level for pre-aiming.
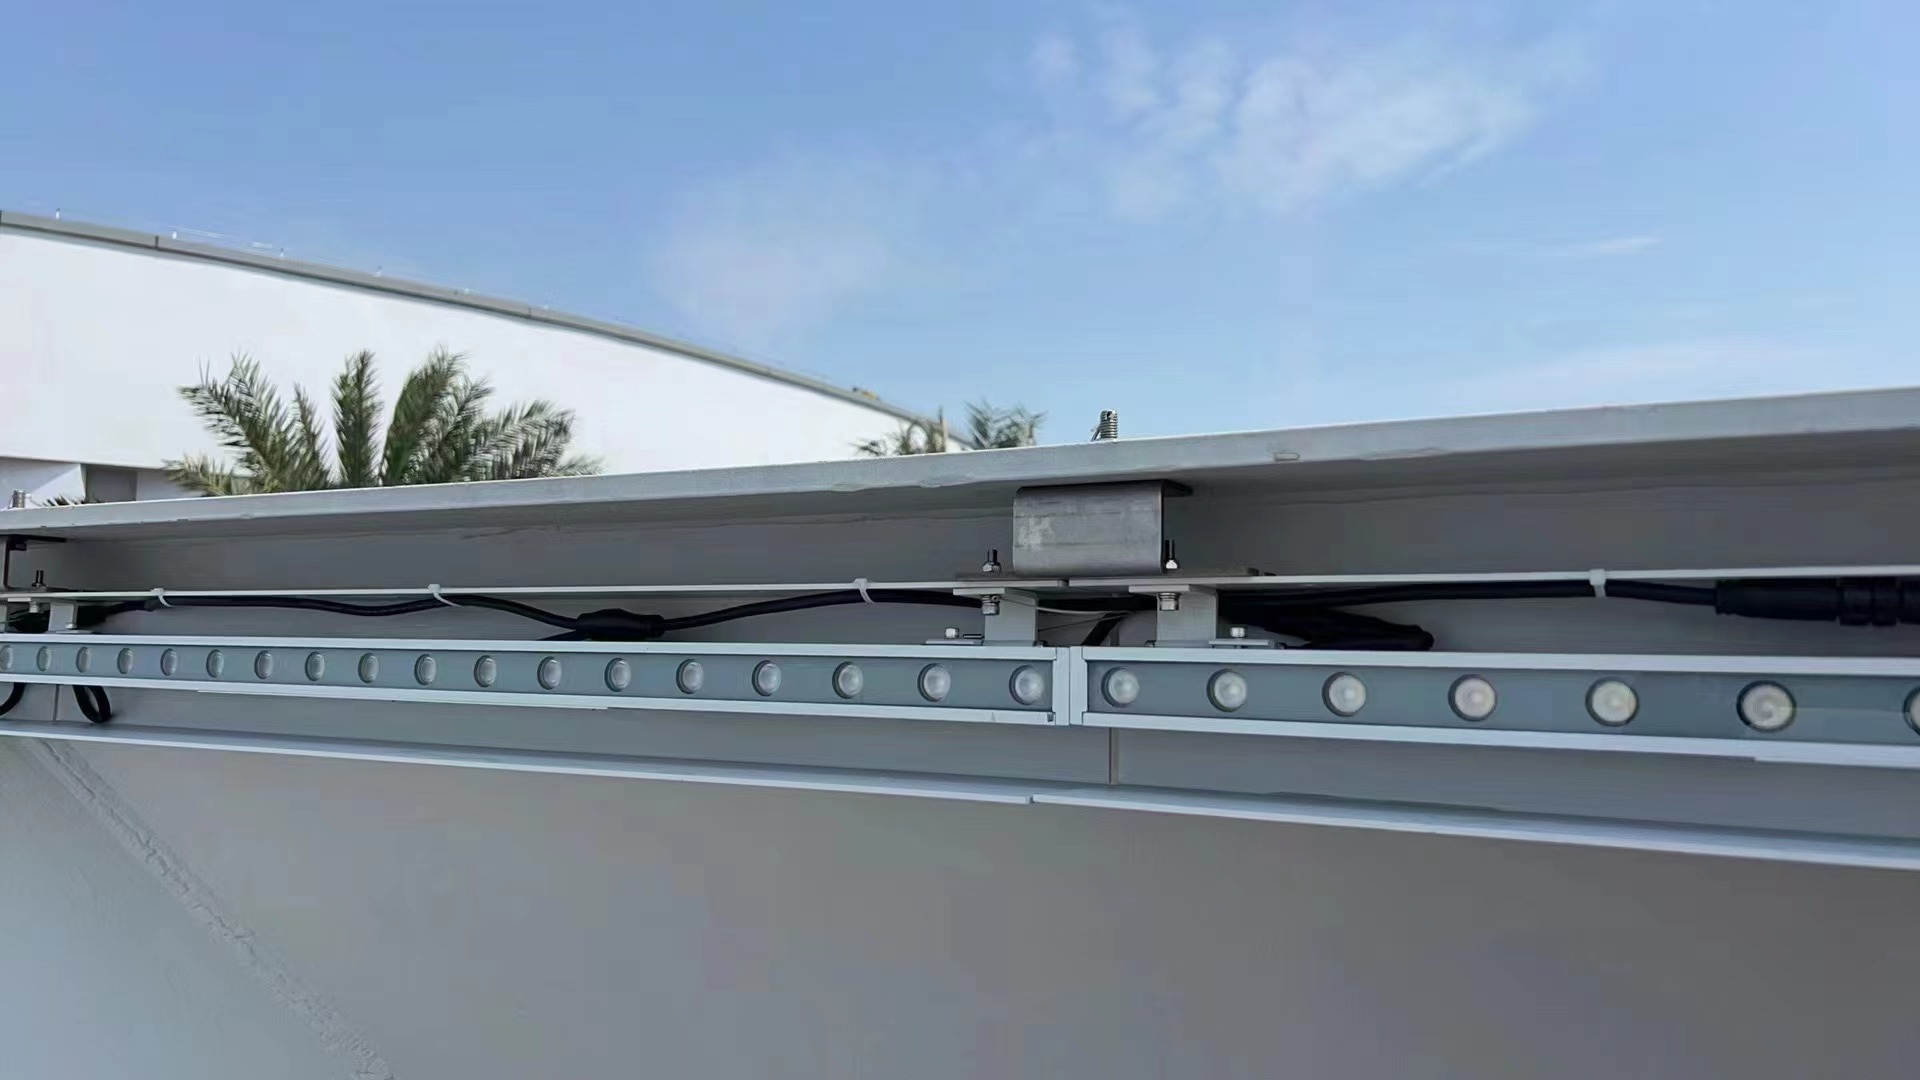
2) Add mounting spacers or extension arms — detailed
What to do:
Small offsets (5–50 mm): use metal spacers or shim plates under the bracket. They’re fast and non-invasive.
Larger offsets (50–300+ mm): install a rigid extension arm or custom bracket plate. Use box-section or round-section arms made from 316 stainless steel or anodized aluminium to resist corrosion. Prefer welded or bolted box sections for stiffness.
Spacer thickness range: 5–50 mm, typical increments: 5 / 10 / 20 / 30 mm.
Extension arm lengths: 50–300 mm, depending on required offset and sightlines.
Fasteners: use stainless steel expansion anchors (M8 or M10) into masonry, or specified through-bolts for reinforced concrete.
Sealing: always seal joints with UV-stable silicone gaskets; use IP-rated cable glands on any altered entry points.
Real-world pitfall: A contractor once stacked thin washers to gain height but used non-stainless fixings; within a year, rust stains and loosening required rework. Use corrosion-resistant materials and proper sealing.
Tools & checks: SDS drill or hammer drill, torque wrench (follow anchor manufacturer torque specs), silicone gun, laser level, and thread sealant where needed.(How to Improve the Weather and Corrosion Resistance of Outdoor Lighting Fixtures)
3) Raise the mounting base / add mounted channel
What to do: If the substrate allows, fix a mounting channel, frame or prefabricated profile to lift the bracket. This yields a clean finish and stable mounting.
When to use: Good when drilling is restricted on facades or when parapets prevent direct mounting. For large modifications, coordinate with a structural engineer.
Real-world note: On a complex façade, adding a shallow aluminum frame gave the same sightline for an entire run of fixtures — quicker and tidier than custom arms for every luminaire.
4) Adjust beam angles and optics during commissioning
What to do: If you cannot change height, optimize optics: select narrower beam lenses or change aiming to reduce spill. Test at night from public viewpoints and measure lux uniformity.
Tools & method: laser level, light meter, DMX scenes for RGB/RGBW fixtures. Make incremental aiming changes and re-check; document approved settings.
Tip: If using DMX scenes, save a “maintenance” preset with reduced output for late-night operation to minimize glare complaints.
During a hotel façade upgrade in Dubai, our installation team used 8 cm aluminum extension arms to correct bracket height differences caused by uneven stone surfaces. After adjustment, illumination uniformity improved by 28% in light distribution tests.”
5) Recalculate Light Distance and Beam Type
If raising the bracket is not possible, compensate by adjusting the distance between the luminaire and the wall or by changing the optical beam configuration. Moving the wall washer slightly closer enhances vertical reach, while choosing a narrower beam angle (e.g., 10°–15°) increases upward projection intensity.Lighting design software (such as Dialux or Relux) can help you simulate different mounting conditions and ensure proper uniformity. Recalculating these parameters ensures the visual result remains balanced and professional, even when height limitations persist.
When to Replace or Customize the Bracket
Sometimes, adjustments alone can’t solve the issue — especially when the wall washer still fails to reach the desired illumination height or the beam alignment remains off even after multiple tweaks. In such cases, replacing or customizing the bracket becomes the most effective solution.
You should replace the bracket when the current one is structurally weak, too short for the lighting distance, or lacks proper adjustment angles. A well-built replacement bracket with a wider tilt range and stronger materials (such as stainless steel or treated aluminum) ensures long-term stability and precise aiming.
If your project involves non-standard surfaces — curved façades, uneven walls, or complex architectural details — consider customized brackets. Tailor-made mounting hardware can provide the exact offset, angle, and height required for consistent wall washing results, without compromising the fixture’s safety or appearance.
Safety and Waterproofing Considerations
When adjusting or raising outdoor wall washer brackets, safety should always come first. Make sure the power is completely disconnected before you begin any installation or repositioning work. Even a small amount of live current near metal fixtures can be dangerous, especially in outdoor environments exposed to moisture.
Next, check all cable entry points and sealing components. Avoid drilling new holes on the lamp body, as this may break the waterproof integrity of the fixture. Instead, use the manufacturer’s designated cable ports and ensure the rubber gaskets or waterproof connectors are tightly sealed. Replacing old or damaged seals can prevent hidden water ingress that often leads to corrosion or short circuits.
It’s also essential to verify that all added components — such as spacers, brackets, or mounting plates — are made from corrosion-resistant materials like stainless steel or anodized aluminum. After installation, apply a thin layer of UV-resistant silicone sealant to any new connection point or exposed screw area for extra protection.
Finally, conduct a waterproof test and a nighttime lighting test. Spray water gently along the fixture and connection areas to confirm there’s no leakage. Once confirmed, power on the lights at night to ensure proper illumination and alignment. A simple round of testing can greatly extend the lifespan and reliability of your outdoor wall washer installation.
Conclusion
Installing outdoor wall washers isn’t just about fixing them to the wall — it’s about achieving the right angle, height, and protection to ensure consistent and long-lasting illumination. When the bracket is too low, taking time to assess the cause, apply proper adjustments, and verify waterproofing can make all the difference between a quick fix and a professional installation.
A well-installed lighting system highlights architectural beauty, improves visibility, and reduces long-term maintenance costs. Whether you choose to adjust, replace, or customize the brackets, the goal remains the same: precise alignment, stable performance, and durable protection against outdoor elements.
For projects that demand reliability and flexibility, LNJAMI provides a full range of LED wall washer lights, custom mounting solutions, and installation support services. With years of experience in architectural and landscape lighting, LNJAMI helps designers, contractors, and property owners achieve flawless results — from façade illumination to large-scale urban lighting projects.
FAQ
Why does a bracket that’s too low ruin a wall-wash effect?
A low bracket shifts the beam’s strike point downward, producing bright lower bands, hot-spots and a dark upper façade — losing the intended vertical uniformity and texture.
What immediate on-site checks should I make when I see uneven washing?
Record (a) mounting height, (b) fixture model & beam angle, and (c) distance from fixture to wall. Also photograph the view from normal public sightlines and run a quick night-time mock-up.
Can I fix a low bracket without drilling new holes?
Yes — start with adjustable multi-axis brackets or add thin spacers/shims (5–50 mm). For larger offsets, use rigid extension arms (50–300 mm) that bolt to existing anchors.
What materials and fasteners should I use outdoors?
Use corrosion-resistant materials: 316 stainless steel or anodized aluminum for arms/brackets; stainless anchors (M8/M10) or through-bolts for concrete; UV-stable silicone for sealing.
When should I replace the bracket instead of adjusting it?
Replace if the bracket is structurally weak, lacks needed tilt/elevation, shows corrosion, or when repeated adjustments still fail to achieve target uniformity.