The Ultimate Guide to Outdoor Wall Washer: Solving Top Dark Zones & Mastering the Art of Light
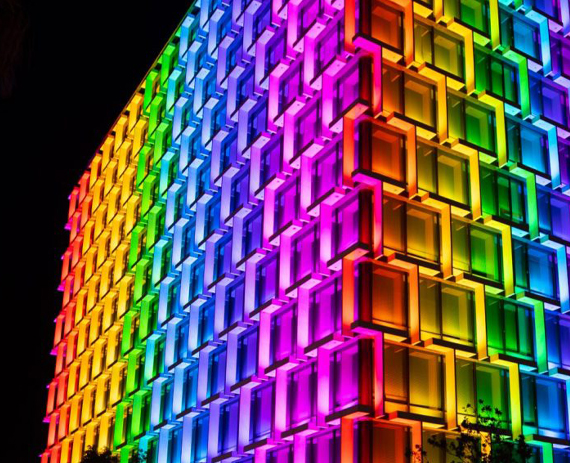
In high-end architectural and interior lighting design, the outdoor wall washer is a fundamental tool for creating atmospheric ambiance. It transcends mere illumination, acting as a brush that uses light to paint upon the canvas of a wall. However, a widespread installation misconception—"the deeper the fixture is hidden, the better"—ruthlessly undermines the visual impact of countless projects. This article systematically debunks this myth and, based on optical principles and DIALux simulation, reveals a "golden rule of installation" proven in top-tier projects, helping you permanently solve stubborn issues like top dark zones and uneven light.
1. Why is it a serious misconception that "the deeper the wall washer, the better"?
In the pursuit of the ultimate minimalist aesthetic of "seeing the light, not the fixture," many designers and clients often fall into the trap of over-concealment. The demand to recess outdoor wall washers as deeply as possible into ceiling grooves stems from a belief that any visible hardware constitutes a design failure. While the intention is to create a magical effect where light appears to emanate from nowhere, this approach blatantly violates fundamental laws of optical physics.
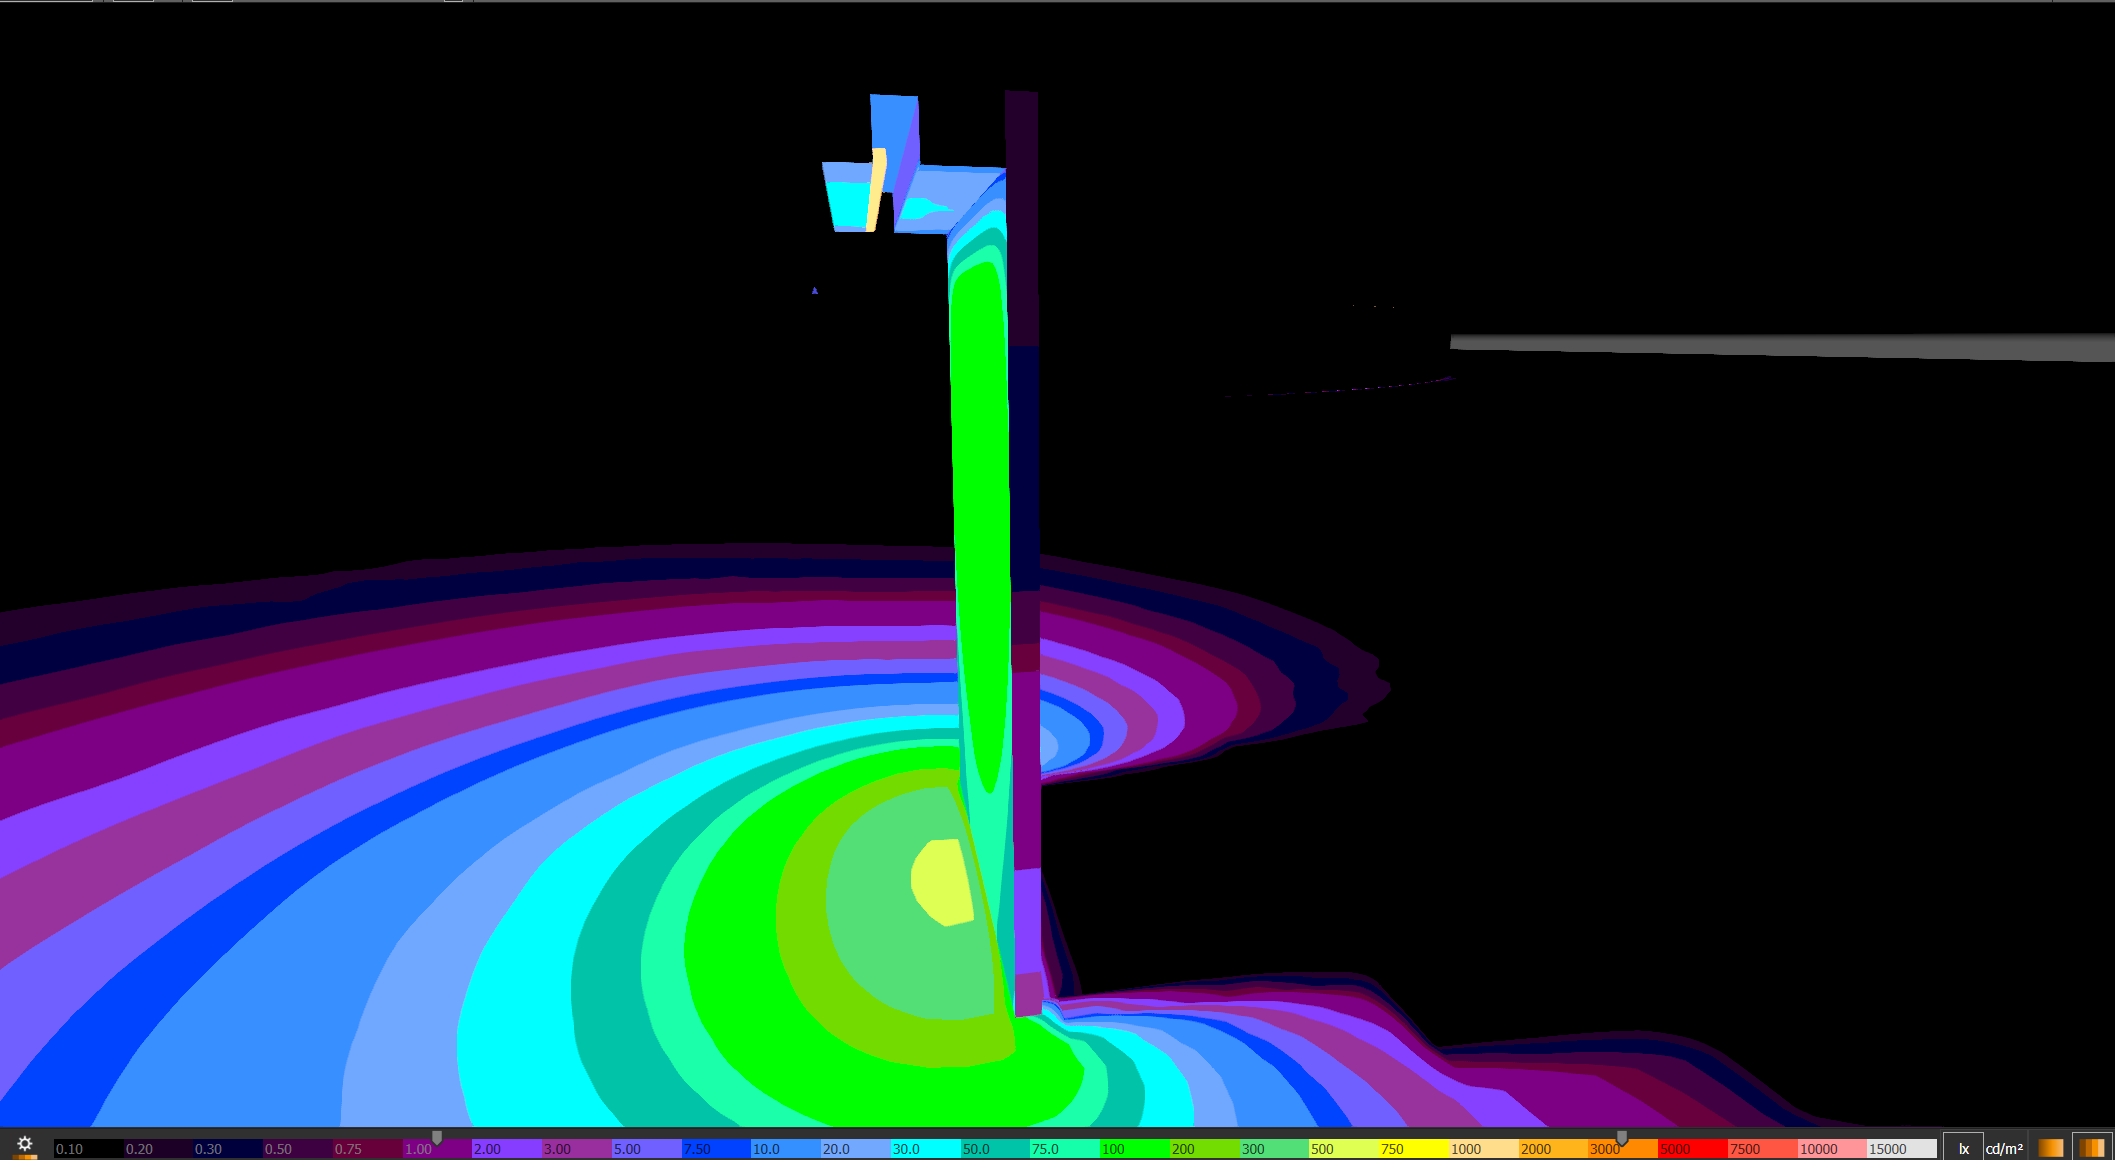
Light does not travel in perfectly parallel beams but has a specific divergence angle. When a fixture is placed too deep within a channel, the side walls physically intercept and absorb a significant portion of the light intended for the wall. This not only results in substantial energy waste—light loss can exceed 30%—but also creates an unavoidable, harsh dark band at the most critical top section of the wall. This defect, known in the industry as "scalloping" or a "shadow fault line," is not an artistic shadow but a technical failure. It brutally severs the integrity of the light curtain, completely contradicting the uniform purity that "outdoor wall washing" aims to achieve.
2. The Scientific Solution: Unveiling the "Light-Emitting Surface Flush" Golden Rule
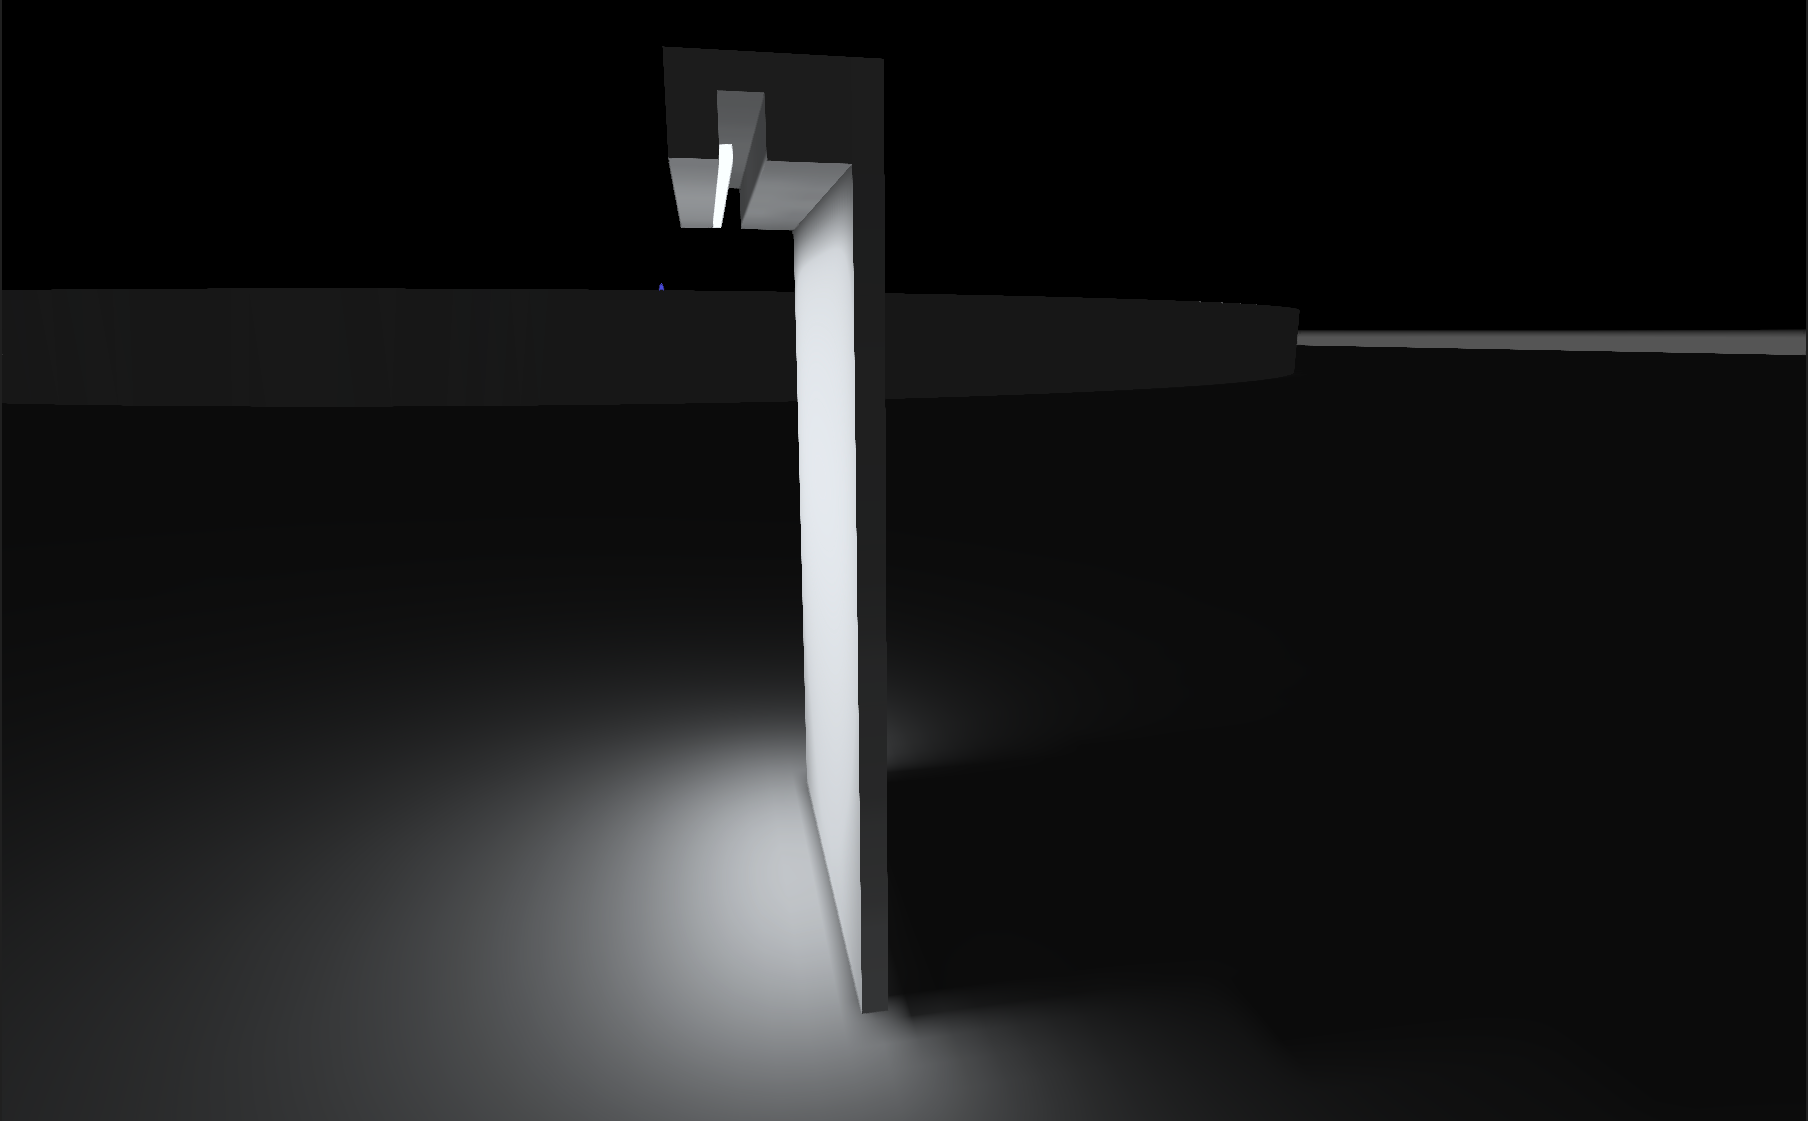
Through extensive laboratory testing and 1:1 optical simulation with DIALux software, we have identified the optimal solution to this challenge. The core is a simple yet highly effective golden rule: Precisely align the wall washer's light-emitting surface flush with the lower edge of the ceiling channel or bulkhead.
This position is a critical balance point, perfectly reconciling aesthetic desires with optical performance. From a concealment perspective, the channel still effectively hides the fixture's body, driver, and all mounting hardware from most viewing angles indoors, maintaining ceiling cleanliness and satisfying the "no-see" aesthetic. Optically, this position ensures that the light's most crucial primary beam has no obstacles the moment it exits the aperture. Light can travel in its most complete and abundant state directly to the wall's base, ensuring a uniform, continuous, and seamless light curtain begins right at the ceiling-wall junction, completely eradicating the dreaded top dark zone.

3. Pursuing Perfection: The Three Pillars of Execution for Flawless Results
Understanding the theory is foundational, but precise implementation is the ultimate key to perfect results. This requires meticulous collaboration across design, construction, and installation—three indispensable pillars.
The first pillar is proactive collaborative design. The lighting designer must be deeply involved from the project's conceptual stage, communicating seamlessly with the architect and interior designer. It is essential to determine the ideal channel width, depth, and shielding angle based on the exact photometric data (beam angle, aperture size, mounting requirements) of the specified wall washer model. These dimensions must be clearly and accurately detailed on construction drawings, serving as the sole reference for all subsequent work.
The second pillar is millimeter-level construction precision. The adage "a miss is as good as a mile" holds true here. The construction team must strictly adhere to the design drawings during layout, framing, and drywall installation. Tolerances for the channel's opening dimensions and straightness must be minimal (recommended ±2mm). Any seemingly minor deviation can prevent achieving the "flush" effect or cause unpleasant unevenness.
The third pillar is professional installation and commissioning. Installers should be treated as optical technicians, not just electricians. They must use tools like laser levels to ensure all fixtures' light-emitting surfaces are on the same absolute horizontal plane. After initial installation, a night-time test is mandatory. Using a lux meter to measure wall illuminance uniformity and making fine adjustments based on actual observation are crucial steps to translate theoretical perfection into stunning reality.
4. Value Sublimation: The Comprehensive Benefits of Correct Installation
Successfully implementing the above process delivers immediate and comprehensive value. The most intuitive benefit is a dramatic leap in visual effect. A wall perfectly and uniformly bathed in light delivers a sense of sophistication and impact that粗糙 (crude) lighting cannot match, instantly elevating the space's quality and character. Secondly, there is significant energy savings and improved economic efficiency. Avoiding light loss from installation errors means achieving superior design goals with a lower energy budget, while drastically reducing the risk and cost of rework due to poor performance. Ultimately, it earns you and your team a reputation for professionalism and client trust, turning a potential problem area into the project's most outstanding highlight.
5. Long-Term Maintenance & Future Evolution: The Key to Sustained Performance
Achieving perfect wall washer lighting is not a one-time event; maintaining its卓越 (excellent) performance is an ongoing process throughout the project's entire lifecycle. This requires establishing systematic maintenance strategies and anticipating technological trends. Many projects look stunning at completion but suffer from severe lumen depreciation, color shift, or partial failure after just a year or two of operation, often due to neglected long-term maintenance planning. Therefore, integrating a long-term management mindset during the design phase is a key differentiator between average and top-tier projects.
First, it is essential to establish a periodic photometric testing regimen. Professional testing using equipment like integrating sphere spectrometers to measure Lumen Maintenance and Color Consistency is recommended every 12-18 months. For large commercial projects, this should be incorporated into the annual facility maintenance plan. This not only identifies failing fixtures for timely replacement but also predicts the entire system's remaining lifespan through data trends, allowing for scientific budget planning and avoiding the financial and operational pressure of unexpected large-scale replacements.
Second, prioritize modularity and upgradeability during technical selection. Lighting technology evolves rapidly; today's top product may become standard in five years. Therefore, choosing fixtures with a modular design—where the light engine, driver, or lens can be replaced individually—is crucial. This significantly reduces long-term maintenance costs (replacing only the failed module, not the entire fixture) and future-proofs the installation. For example, selecting fixtures that support DALI-2 or Zhaga standards today allows for a smooth upgrade to more advanced control systems in the future without rewiring, gracefully adapting to technological evolution.
Finally, we recommend creating a comprehensive "Light Environment Digital Twin" for critical spaces. This archive should go far beyond standard as-built drawings. It must include: the specific model, production batch, and photometric parameters of every fixture; a comparison of DIALux simulation reports against post-installation photos; optimal dimming scene configuration parameters; and a recommended spare parts list. This archive is an invaluable intangible asset, ensuring that even if the original team is unavailable a decade later, new maintainers can accurately understand the design intent and perform repairs and replacements quickly, preserving the space's visual appeal for years to come.

Conclusion: Let Professionalism Achieve Art
The design and installation of wall washers is essentially a journey of finding the perfect balance between "revealing" and "concealing." Blindly pursuing deep concealment is a futile effort that only creates flaws. Adhering to the scientific "Light-Emitting Surface Flush" rule finds the perfect equilibrium between physical constraints and aesthetic pursuit. It intelligently hides the tool while magnificently showcasing the power and beauty of light itself.
If you are planning a landmark lighting project or looking for a reliable partner in outdoor architectural illumination, LNJAMI is here to support you. With over 15 years of expertise in façade, bridge, and landscape lighting, our team provides not only high-quality LED wall washer lights but also tailored design solutions, DIALux simulations, and professional installation guidance.
Contact us today to transform your vision into a brilliant reality.
Frequently Asked Questions (FAQ)
Q: If the project has already been completed but top dark zones appear, is there any remedy?
A: Yes, depending on the situation. For minor unevenness, you can use adjustment brackets or shims of specific thickness behind the fixture to raise the light-emitting surface flush with the channel edge. If the issue is more severe, a very narrow shielding plate can be added on the exposed surface, or light milling adjustments can be made to the existing groove, provided structural safety is not compromised. The most thorough solution is to remove a portion of the ceiling and reinstall the fixture correctly.
Q: Are there installation differences between COB wall washers and SMD wall washers?
A: Yes. COB (Chip-on-Board) fixtures usually provide smoother, more uniform light but require higher installation precision—any misalignment can cause visible brightness differences. SMD (Surface-Mounted Device) fixtures, with multiple distributed LEDs, are somewhat more tolerant of small deviations, but they require stricter shielding angle design to avoid visible hot spots. Always follow the technical manual of the selected fixture for accurate installation requirements.
Q: Without professional photometric equipment, how can I visually check if the installation effect meets the standard?
A: A practical method is to use a standard grayscale card (or even a plain white sheet of paper) placed vertically against the wall. Observe from different angles whether the brightness remains consistent from top to bottom. If the white appears uniformly bright without noticeable shading differences, the uniformity is generally acceptable. However, for professional projects, we strongly recommend using a portable lux meter for objective measurement.